Accounting Tutorial
If you'd like to know how to better manage your personal finances our aim here is to provide you with an easy
example of a bank statement reconciliation and a budget and at the same time illustrate some of the basic principles
and terminology
of double-entry bookkeeping using our LedgerLite program. (If it doesn't make much sense at first
just continue following the instructions and it'll definitely become clearer as you progress.)

(NOTE: If nothing happens when you click the download link try the right mouse button and select Save link as from the pop-up menu.
If you get a message saying it cannot be downloaded securely click on the down-arrow and select Keep or Keep Anyway. If you still
have difficulty please see the LedgerLite FAQ page.)
 Because the same concepts
apply to both personal and business finances you may be surprised to discover you're actually taking the first steps
towards becoming the financial controller of a large organisation.
Because the same concepts
apply to both personal and business finances you may be surprised to discover you're actually taking the first steps
towards becoming the financial controller of a large organisation.
Even if your career aspirations are not so ambitious or your interests lie in areas other than accounting (which is
understandable!) a good grasp of double-entry bookkeeping can be of significant value in managing your own
financial resources. The ability to understand financial reports such as a balance
sheet or income statement is useful when making an investment decision and what better way to become familiar
with them than by using them on your own personal finances.
Entering a Bank Statement
Let's suppose John has just received his bank statement and it looks something like this.
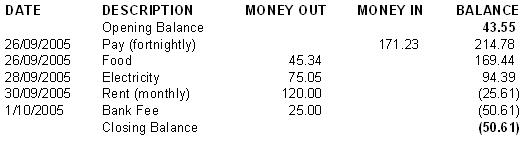
John notices immediately his bank account is overdrawn even though he was hopeful when he
got paid there would be enough money in it to buy food, pay his rent and
pay the electricity bill (he forgot that his bank also charges a significant fee whenever his account
is overdrawn!) He decides from now on in order to avoid overdrawing his account
and being forced to pay the extra bank fee he will record his transactions in a cashbook.
This will allow John to check his balance any time without having to wait for his
statement to arrive. It will also allow him to enter transactions before they occur so
he can see their effect on his bank balance. He can then adjust his
spending pattern to avoid his account becoming overdrawn.
John begins by downloading LedgerLite.
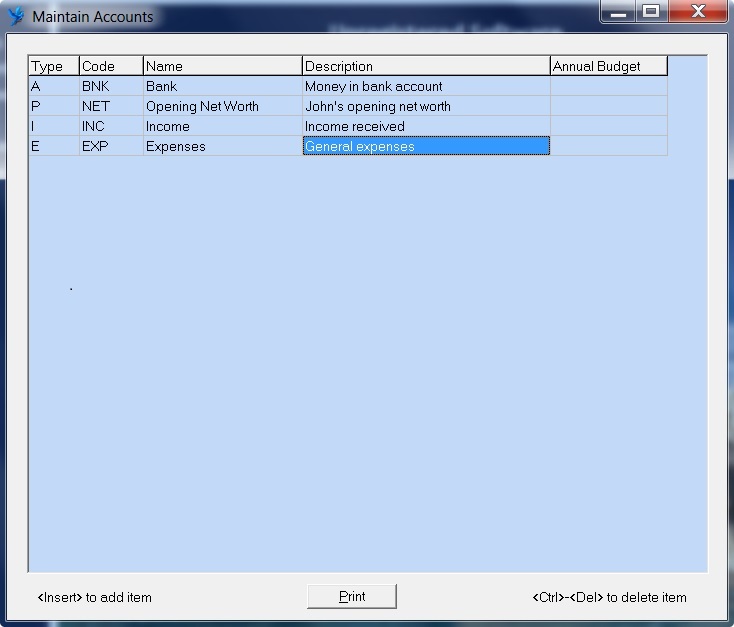
Before he can create a cashbook and chart of accounts for his personal finances John must
delete the default cashbook, taxes and chart of accounts that are created automatically when LedgerLite is first run.
To do this he goes to the Maintain menu, selects Cashbooks and deletes the default
cashbook by holding down the <Ctrl> key and pressing the <Delete> key. He then goes to the
Maintain menu again, selects Taxes and deletes all the default taxes.
He then goes back to the Maintain menu, selects Chart of Accounts and deletes all the default accounts.
He then adds four new accounts named Bank, Opening Net Worth, Income and Expenses as shown below.
Notice that these accounts have
different types A for Asset, P for Equity, I for Income and E
for Expense respectively. (Equity doesn't begin with P but we had to use something other
than E since we already chose that for expense. You can think of P for property which means essentially the same
as equity and represents what the company, or in our case John Smith, owns ie. his net worth.) There is another
account type L for Liability that we'll use later when we look at budgeting.
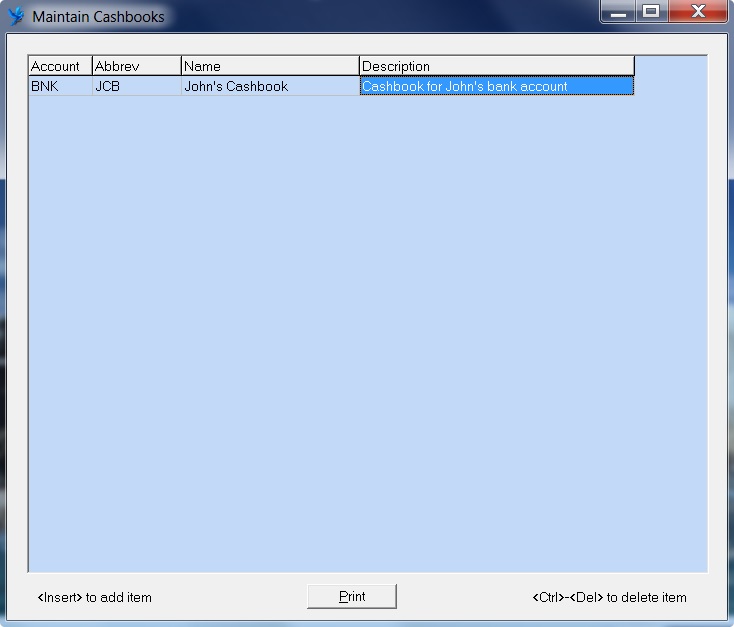
To create a new cashbook John goes to the Maintain menu and selects Cashbooks.
He then adds a new cashbook giving it the abbreviation JCB and the name John's Cashbook.
In the account column he enters BNK to associate this cashbook with the BNK account in the general ledger.
(This account can also be selected from a list by double-clicking in the account field.)
Next John goes to the Cashbooks screen by clicking on Cashbooks in the dark blue navigation area
on the left. He then selects the cashbook from the drop-down list labelled Cashbook and proceeds to
create entries in the cashbook from his current bank statement.
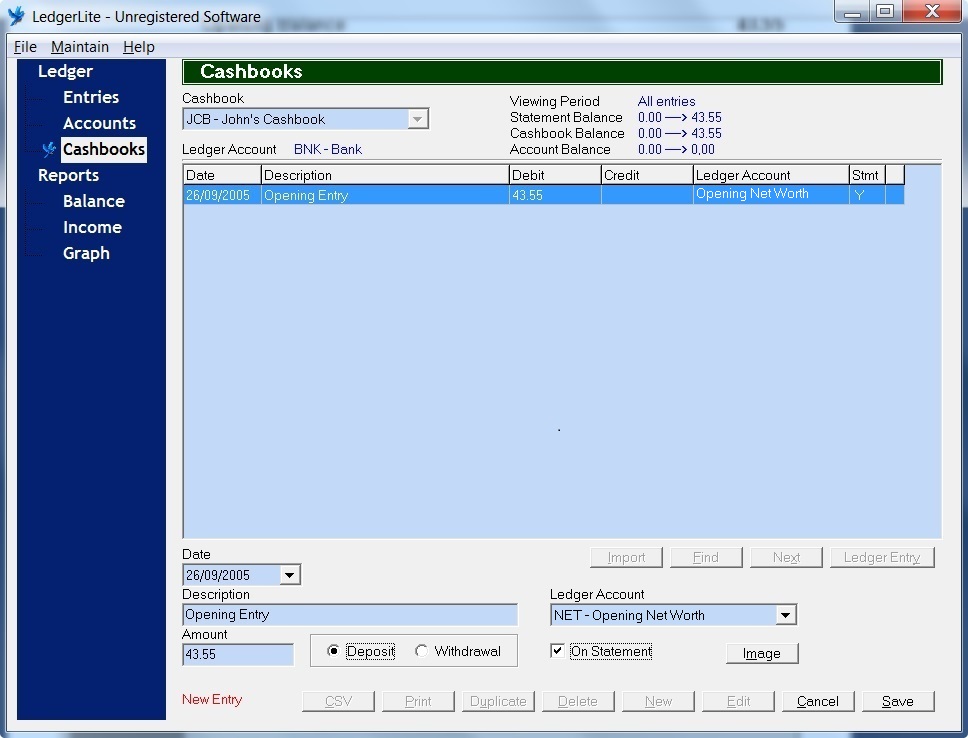
To create the opening entry he clicks on the New button to switch the
screen to New Entry mode. He then enters the Date as 26/09/2005, the Description
as Opening Entry and the Amount as 43.55.
Because the opening balance of John's account is in credit (ie. not overdrawn) he makes the opening entry in the cashbook
a Deposit (which is a debit.) If the opening balance was a debit (ie. overdrawn) John would need to make the opening entry
in the cashbook a Withdrawal (which is a credit.) This seems illogical at first glance and is
one of the reasons newcomers to double-entry bookkeeping despair of it making sense.
The confusion occurs because in popular usage the terms debit and credit are most commonly used from the bank's perspective.
However because what is a liability for the bank is actually an asset for the account holder
when John enters the bank statement into his own accounting system he must reverse the position of the entries. (If
this doesn't make sense don't worry about it for now and
just continue with the example. When you are ready for a more detailed explanation of debits and credits you can refer to our essay
on accounting theory.)
Because the opening entry represents John's net worth at the statement opening date of 26/09/2005 he selects the equity
account NET - Opening Net Worth as the Ledger Account. And because he is making the entry
from a bank statement he puts a tick in the check box next to On Statement. Once the entry is complete John
clicks the Save button to save the entry to the database.
As soon as John does this two things happen. Firstly, the cashbook entry is saved to the database and
secondly, a double-entry (consisting of a debit to the BNK - Bank account and a credit to the NET - Opening Net Worth
account) is created in the general ledger and linked to the cashbook entry.
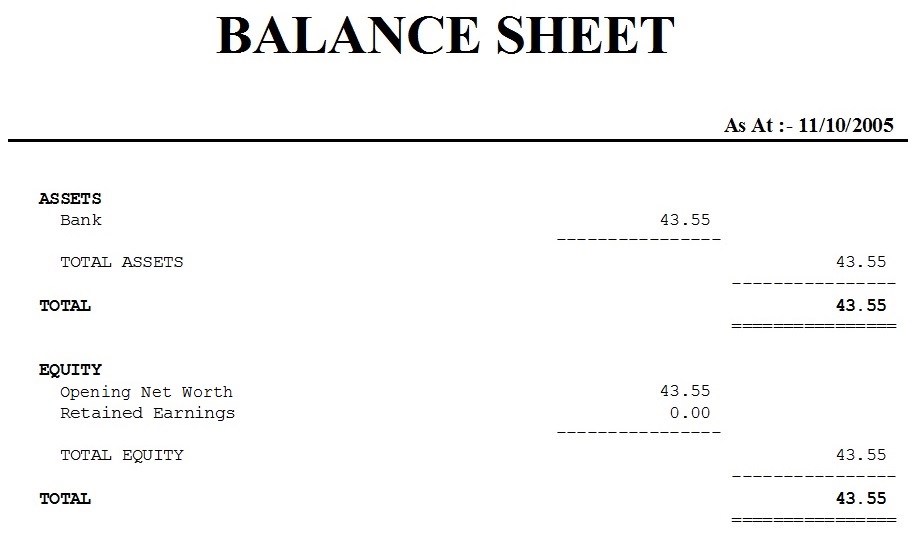
At this point John views the balance sheet by clicking on Balance in the dark blue navigation area
on the left and then clicking on the Print button in the bottom right-hand corner. The balance sheet
shows the balances of John's asset and equity accounts and provides him with a statement of his current financial
position. It tells him that his total assets are 43.55 and his total equity is 43.55.
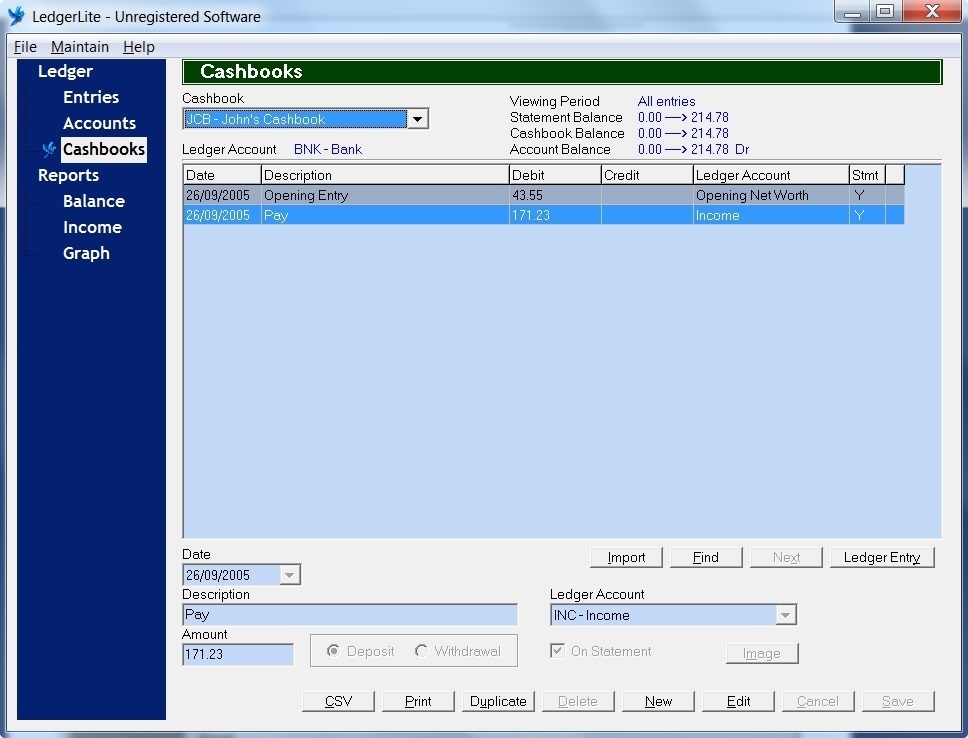
John now goes back to the Cashbooks screen, clicks on the New button and proceeds to
enter the next entry on his statement. He enters the Date as 26/09/2005, the Description
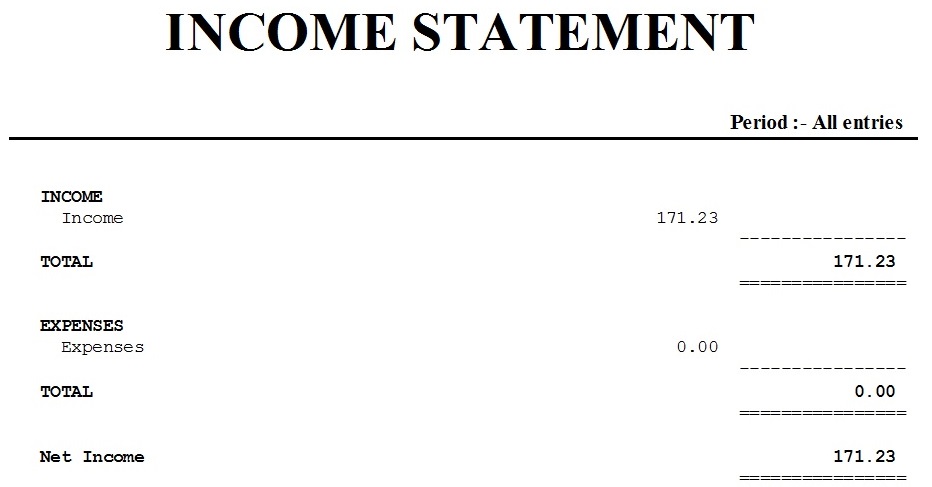
as Pay and the Amount as 171.23. Because John's pay is credited to his account he makes this
entry a Deposit (Debit.) He selects INC - Income as the Ledger Account and puts a tick in the check box
next to On Statement. Once the entry is complete he clicks on the Save button. (Again a double-entry
will automatically be created debiting the BNK account and crediting the INC account.)
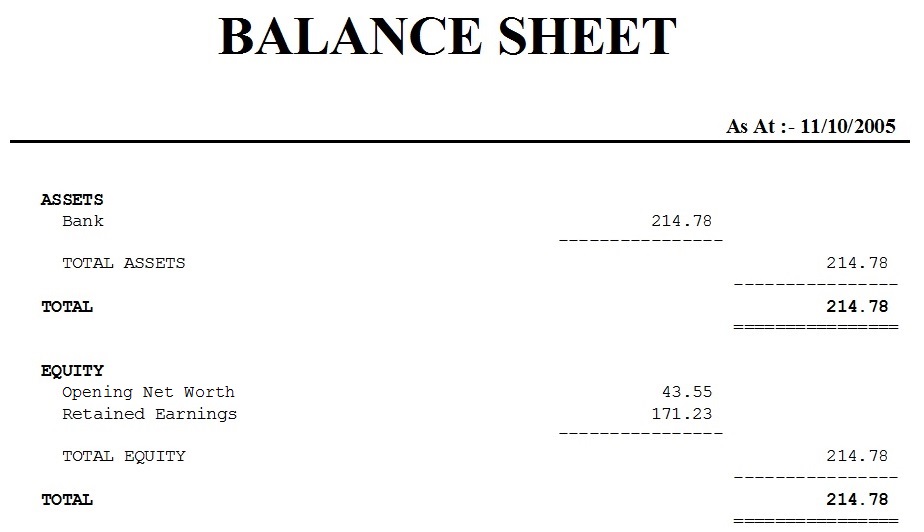
John then takes another look at the balance sheet and notices that since
he entered his pay both his Bank account balance and his total assets have increased by the amount of
his pay to 214.78. He also notices that his pay has been added to the Retained Earnings amount.
This is because his pay was identified as income when he selected INC - Income as the other account.
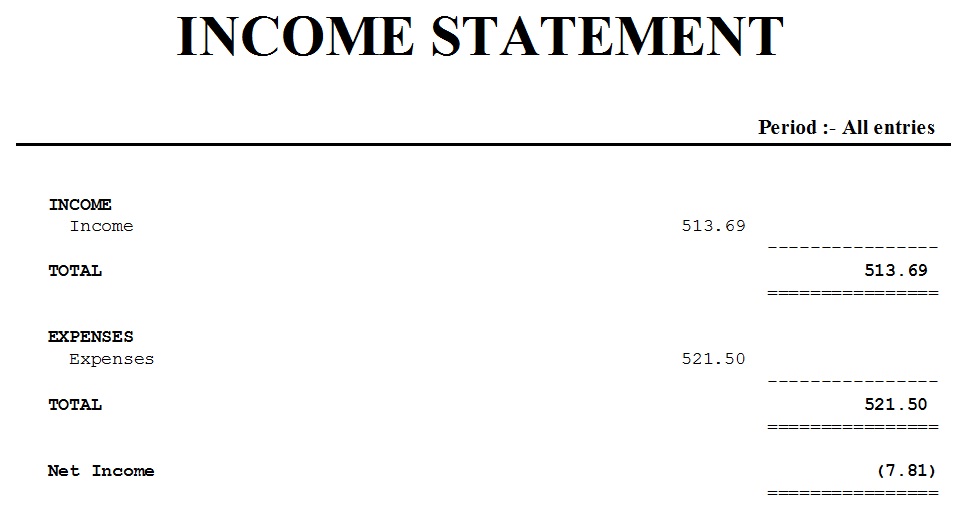
John verifies that his pay was in fact added to the Income account by taking a look at the income statement.
He does this by clicking on Income in the dark blue navigation area
on the left and then clicking on the Print button in the bottom right-hand corner. The income statement
shows the balances of John's income and expense accounts and provides him with a picture of his financial
performance. (Net Income is equal to total income minus total expenses and is the same as Retained
Earnings on the balance sheet.)
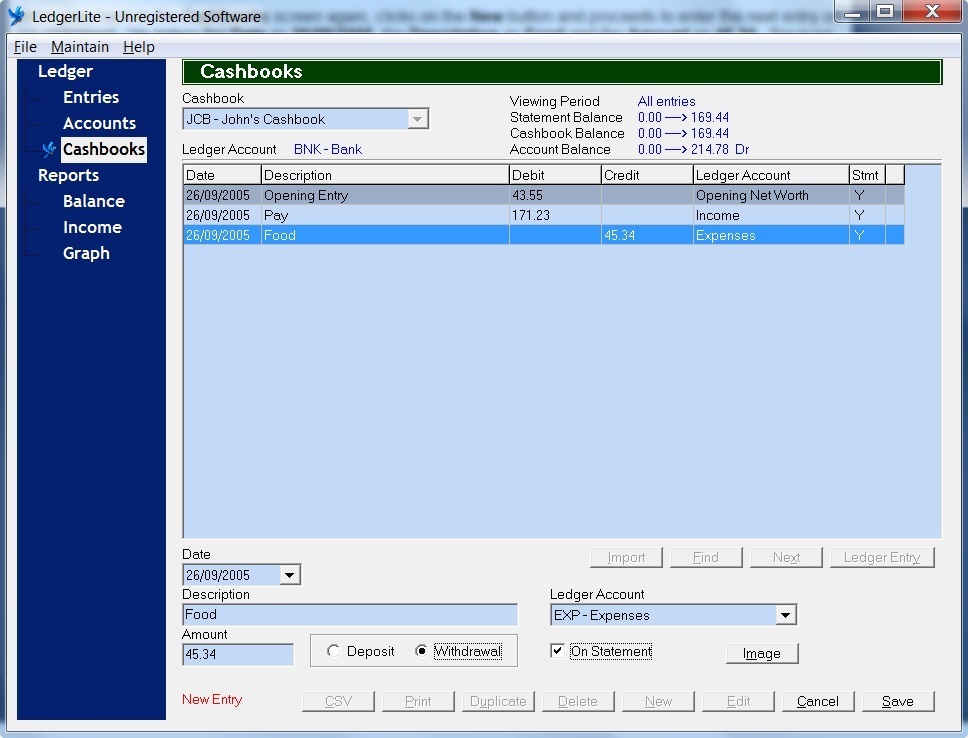
John goes back to the Cashbooks screen again, clicks on the New button and proceeds to
enter the next entry on his statement. He enters the Date as 26/09/2005, the Description
as Food and the Amount as 45.34. Because this entry is a debit on John's bank statement he makes it
a Withdrawal (Credit) when he enters it into his own accounting system. He selects EXP - Expenses as the other
account and puts a tick in the check box next to On Statement. Once the entry is complete he clicks on the Save button.
John takes another look at the income statement where he sees that his food expense has been added
to the Expenses account and at the same time subtracted from his Net Income.
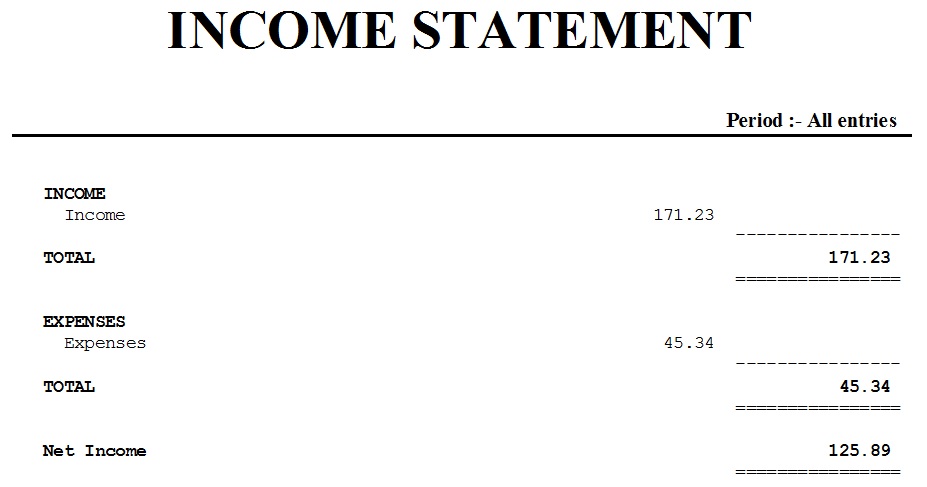
And looking at the balance sheet John sees that both his Bank account and Retained Earnings
have reduced by the same amount.
John goes back to the Cashbooks screen and finishes entering the items from his
bank statement.
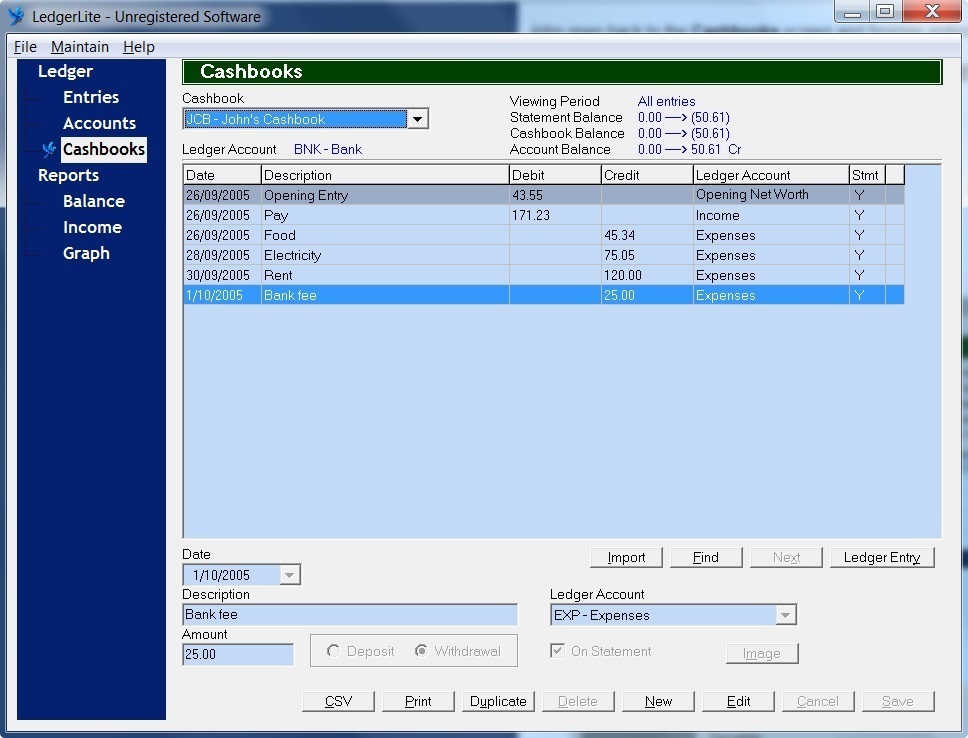
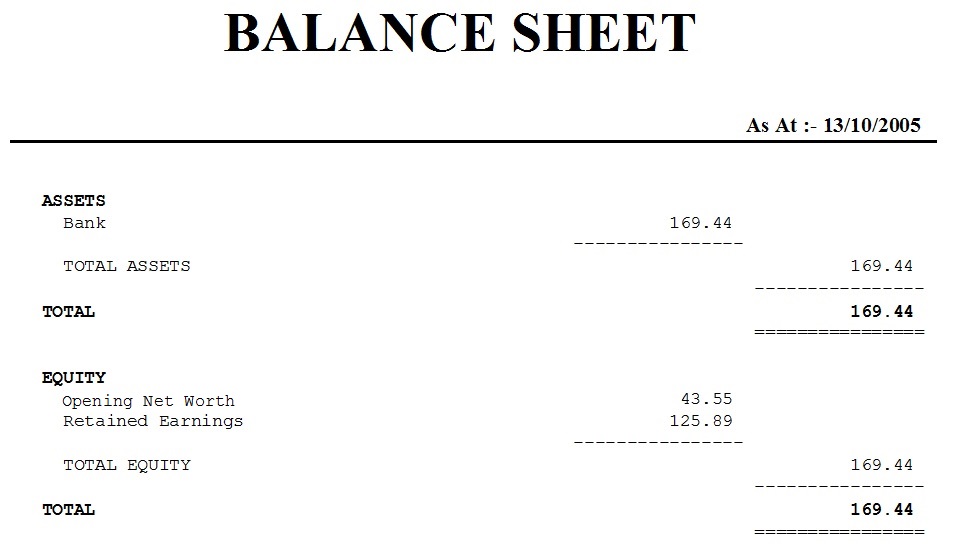
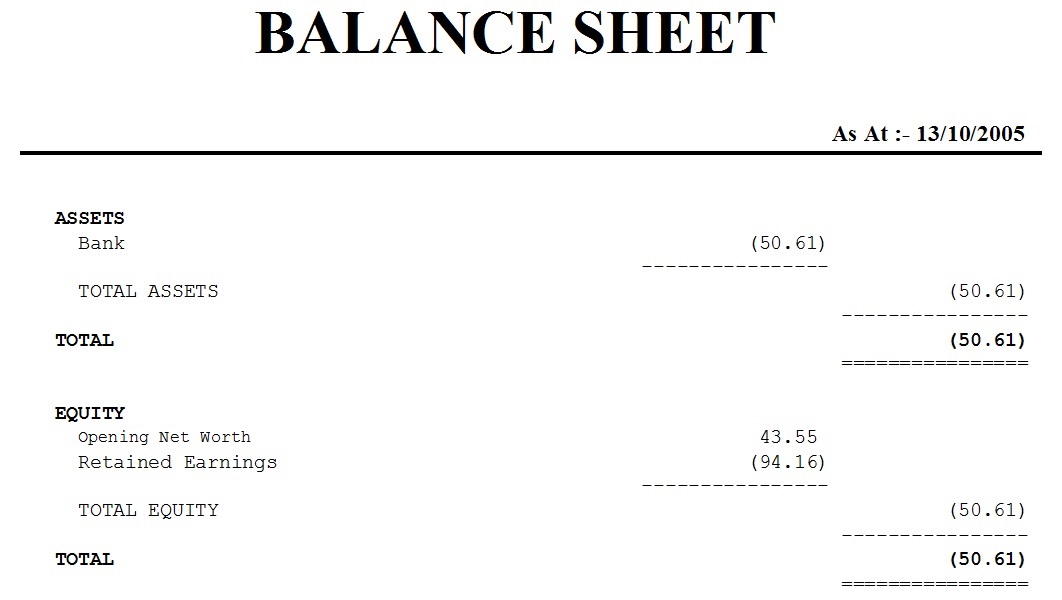
Looking at the balance sheet again John notices that his Bank account balance is
in parentheses indicating that his account is now overdrawn. The Retained Earnings
amount is also in parentheses because his total expenses have exceeded his total income.
And looking at the income statement John sees that the Net Income amount is also in parentheses
and is the same as Retained Earnings.

Entering Additional Transactions
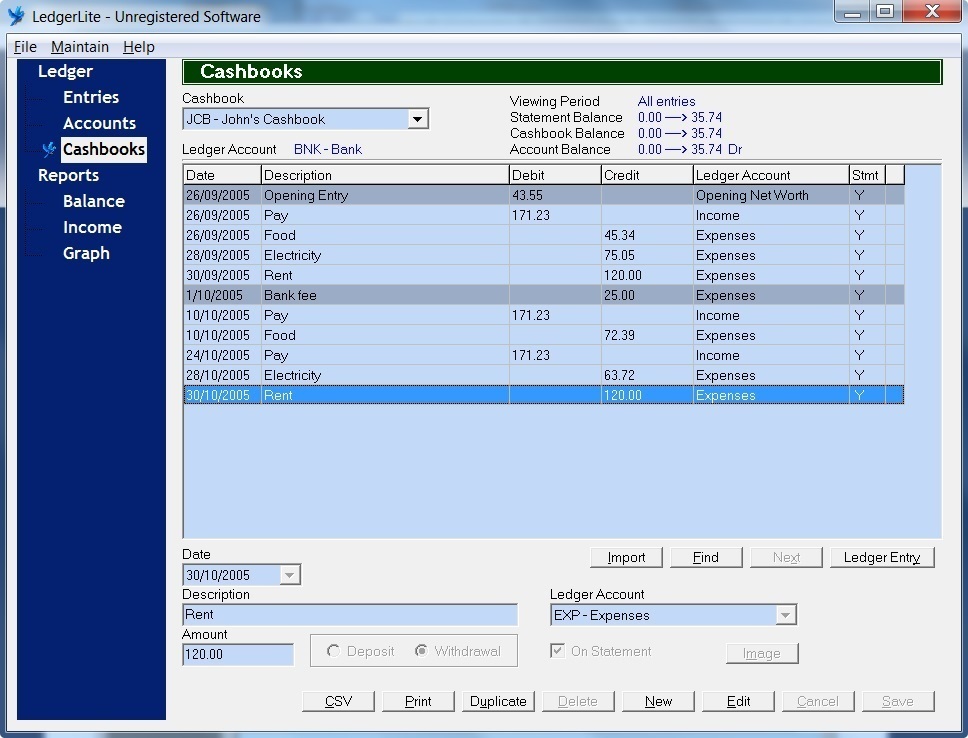
Before John receives his next bank statement he records the following additional transactions in his cashbook.
However because they have not yet appeared on his bank statement he does not put a tick in the On Statement check box.
| 10/10/2005 | Pay | 171.23 | |
| 10/10/2005 | Food | 72.39 | |
| 24/10/2005 | Pay | 171.23 | |
| 28/10/2005 | Electricity | 63.72 | |
| 30/10/2005 | Rent | 120.00 |
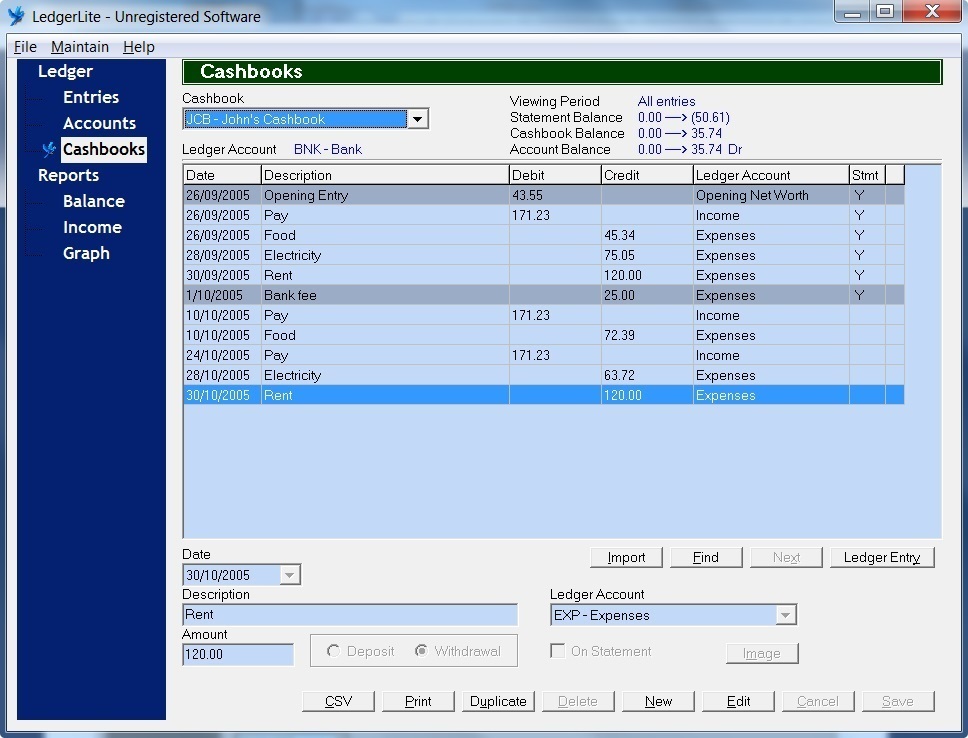
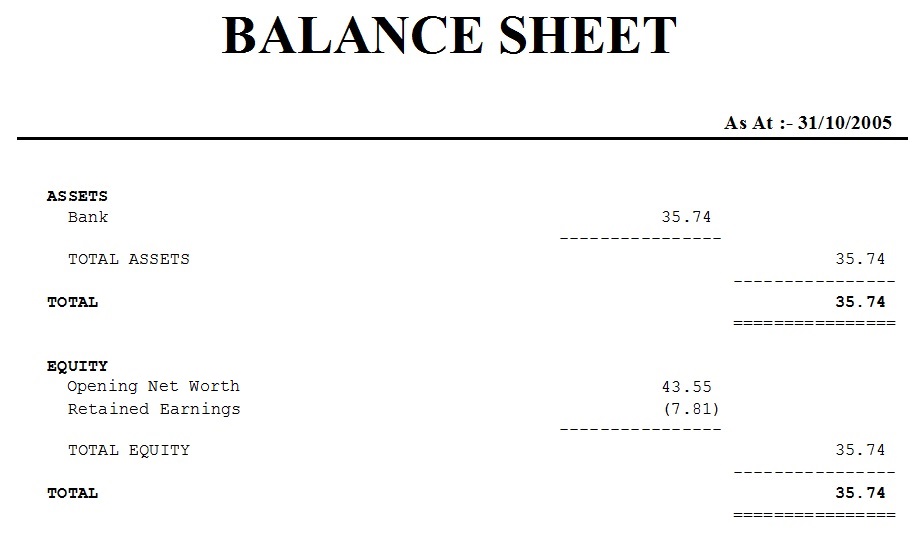
John can now check his financial position without having his bank statement by simply looking at his balance sheet
(provided there are no other transactions on his bank account that he is unaware of.) This tells him that his position has improved because his Bank
account is no longer overdrawn (it is not in parentheses.) However his Retained Earnings are still in parentheses which means
that his total expenses are still greater than his income during the period since he began entering transactions
into the cashbook.
To find out more information about his Retained Earnings John looks at his income statement.
Reconciling the Bank Statement
Eventually John receives his bank statement which looks like this.
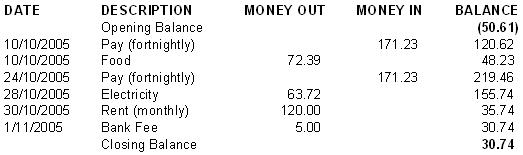
John now wishes to reconcile his cashbook with his bank statement. The first thing he
must do is check that the opening balance on his bank statement agrees with the Statement
Balance shown at the top of the cashbook screen. In this case the opening balance is
a debit (overdraft) of 50.61. This matches the cashbook's statement balance
of the same amount except that the cashbook balance is a credit instead of a debit for the
reason described earlier.
The next step in the reconciliation process is to look at each transaction on the bank statement
and match it with the corresponding entry in the cashbook. Once the matching cashbook entry has been
found John is able to record against that entry the fact that it has appeared on the bank statement.
He does this by double-clicking on the entry in the grid causing the letter Y to appear in the column
headed Stmt.
Finally John must check his bank statement to see if there are any additional transactions that
need to be entered into the cashbook. In this case there is a bank fee of 5.00 on 1/11/2005. John enters this
in the usual way remembering to put a tick in the On Statement check box.
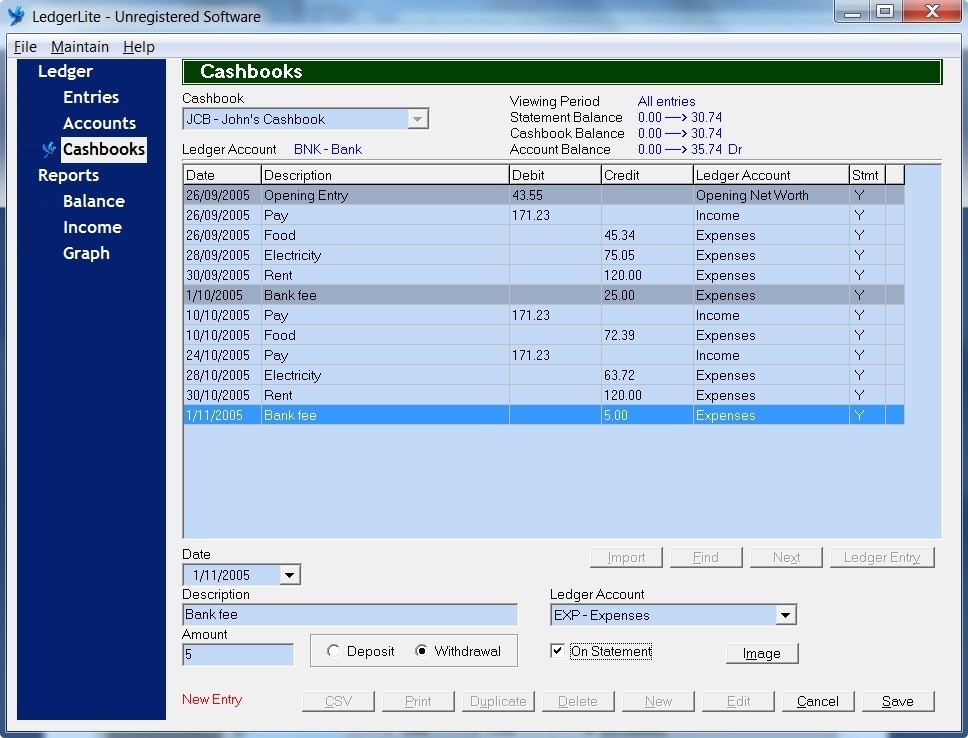
John can now verify that the reconciliation is correct by checking that the closing balance on his bank
statement agrees with the Statement Balance shown at the top of the cashbook screen.
Budgeting
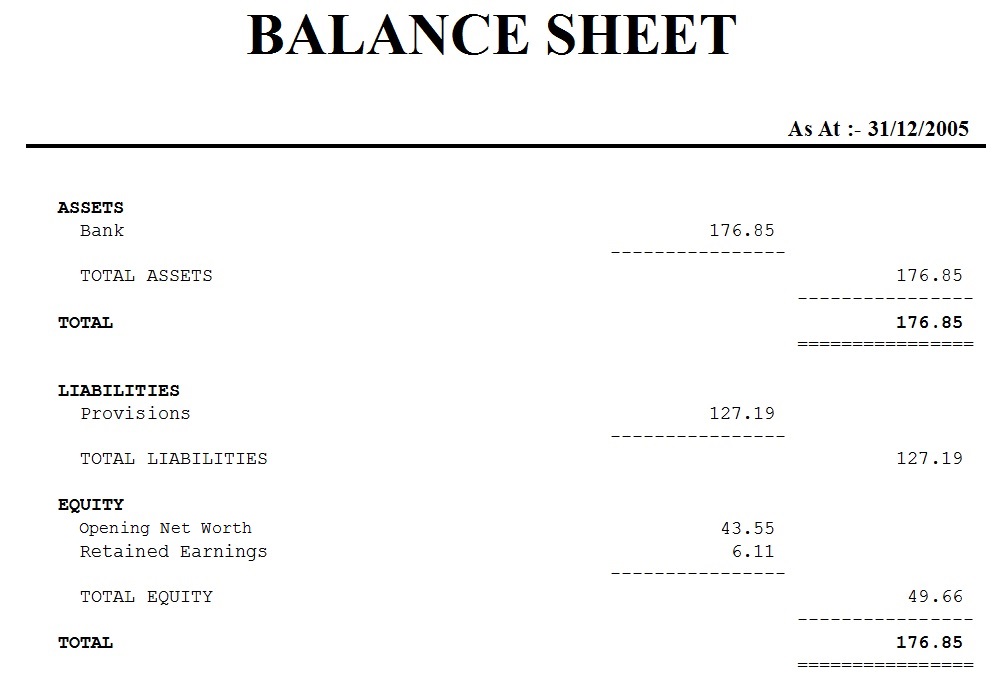
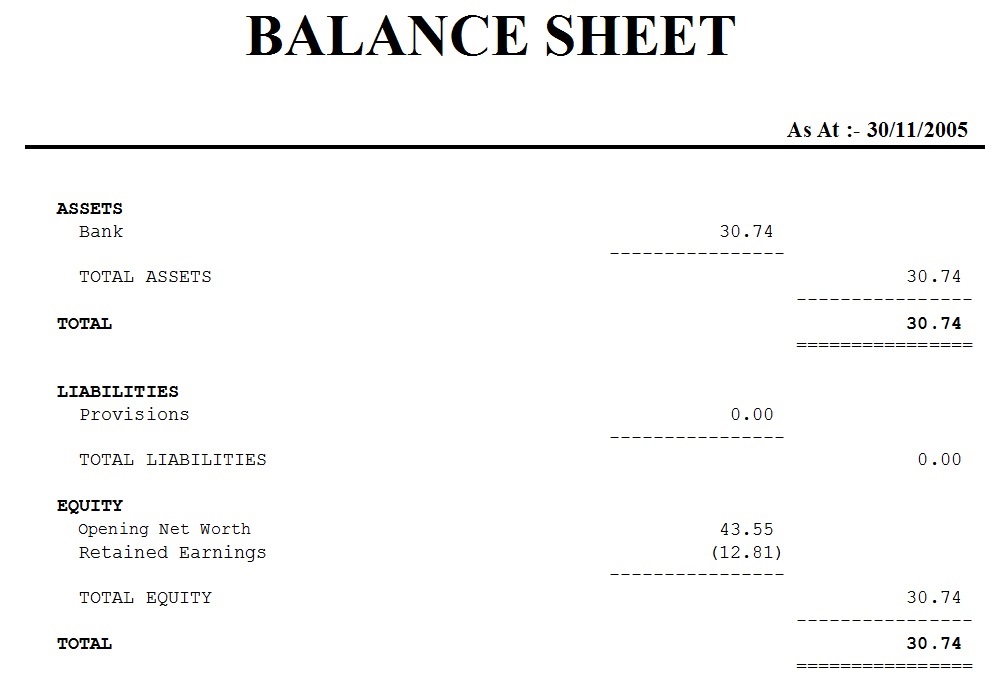
If John looks at his balance sheet he can see that his total assets are 30.74 and his
total equity is 30.74. Another way of saying this is that John currently has 30.74 in the bank
and that he is free to use this money in whichever way he chooses.

However if John wants his financial position to improve in the future rather than deteriorate he must
take into account his likely future income and expenses before making a decision about how he can best
use his current resources. This process of identifying and estimating future income and expenses
is known as budgeting and the list used to describe this information is referred to
as a budget.
John decides to draw up a budget based on his recent financial history recorded in the cashbook
and comes up with the following.
| Pay | 171.23 (fortnightly) | |
| Food | 30.00 (weekly) | |
| Electricity | 70.00 (monthly) | |
| Rent | 120.00 (monthly) | |
| Bank fee | 10.00 (monthly) |
After John receives his next pay but before he goes on a spending spree he wants to
ensure he leaves enough money in his account to cover his anticipated expenses
without his account becoming overdrawn. If all his expenses were payable
fortnightly it would be easy to determine how much he should set aside each time he receives his pay. However
most of his expenses occur on either a weekly or monthly basis so he needs to do some arithmetic
to determine how much he should reserve from his fortnightly pay.
| Food | 30.00 (weekly) | x 2 | = | 60.00 (fortnightly) | |
| Electricity | 70.00 (monthly) | x 12 / 26 | = | 32.31 (fortnightly) | |
| Rent | 120.00 (monthly) | x 12 / 26 | = | 55.38 (fortnightly) | |
| Bank fee | 10.00 (monthly) | x 12 / 26 | = | 4.62 (fortnightly) | |
| TOTAL | = | 152.31 (fortnightly) |
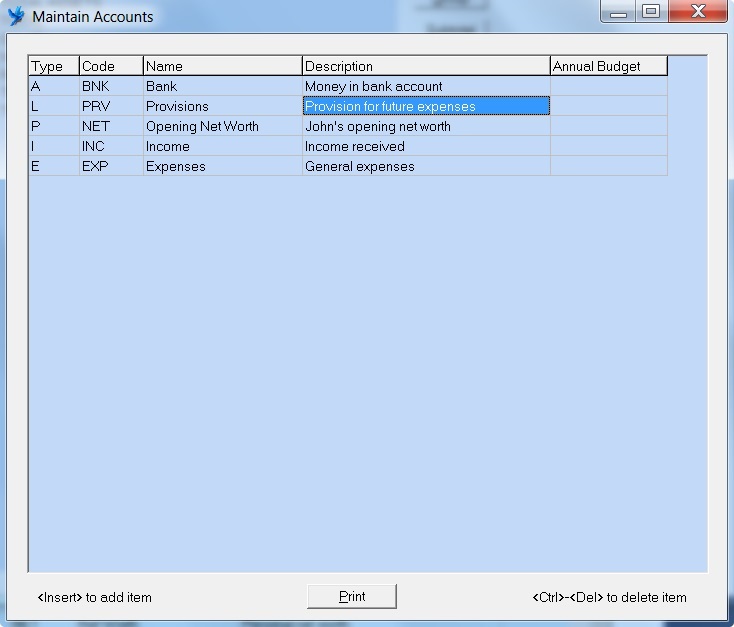
To set aside funds for future expenses John needs to create a new account.
To do this he goes to the Maintain menu and selects Accounts.
He then adds a new account named Provisions with the account
type L for Liability as shown below.
On the Balance Sheet screen John creates a new heading named LIABILITIES and a new
subtotal named TOTAL LIABILITIES and positions the new Provisions account between them as shown.
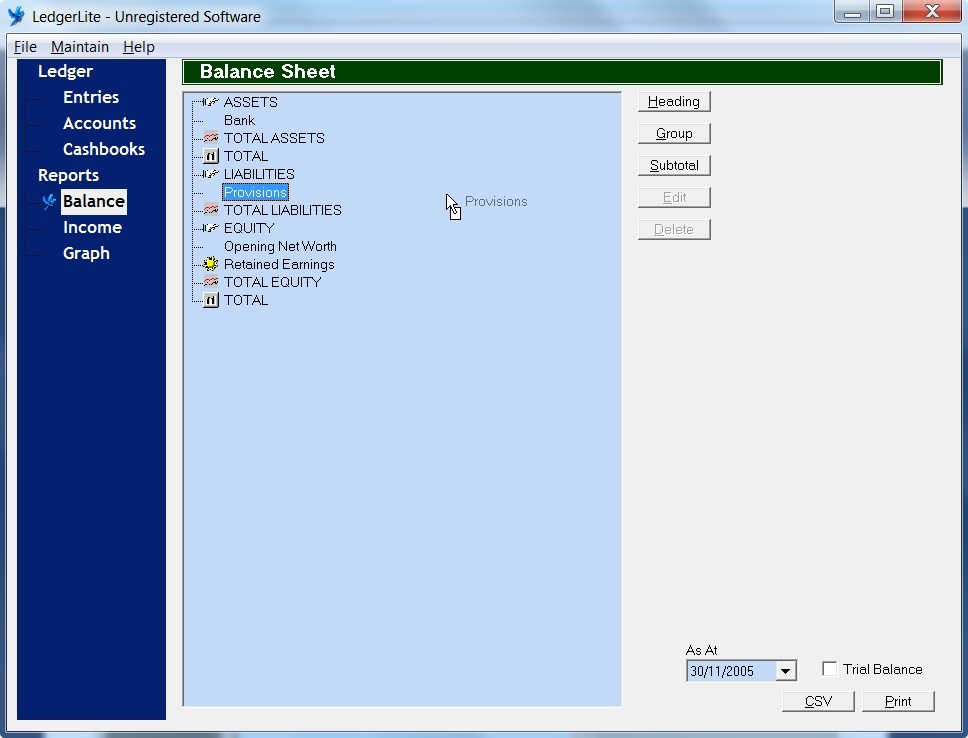
Looking at the balance sheet John notices that there is now a new Liabilities section showing the
balance of his new Provisions account to be zero.
When John receives his pay of 171.23 on 7/11/2005 he enters it into the cashbook.
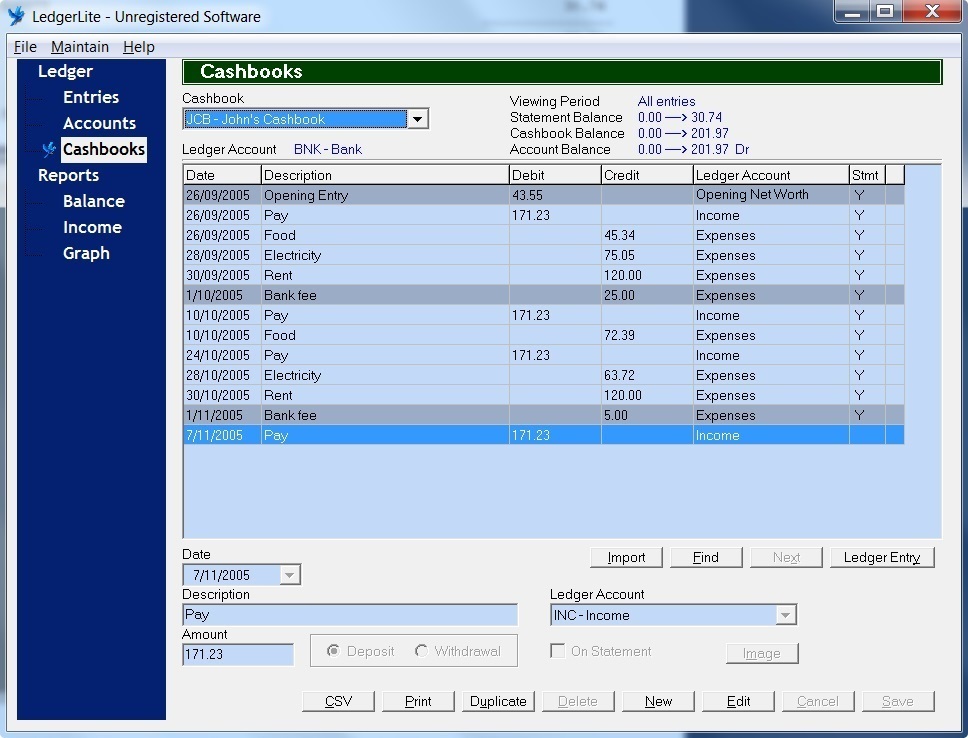
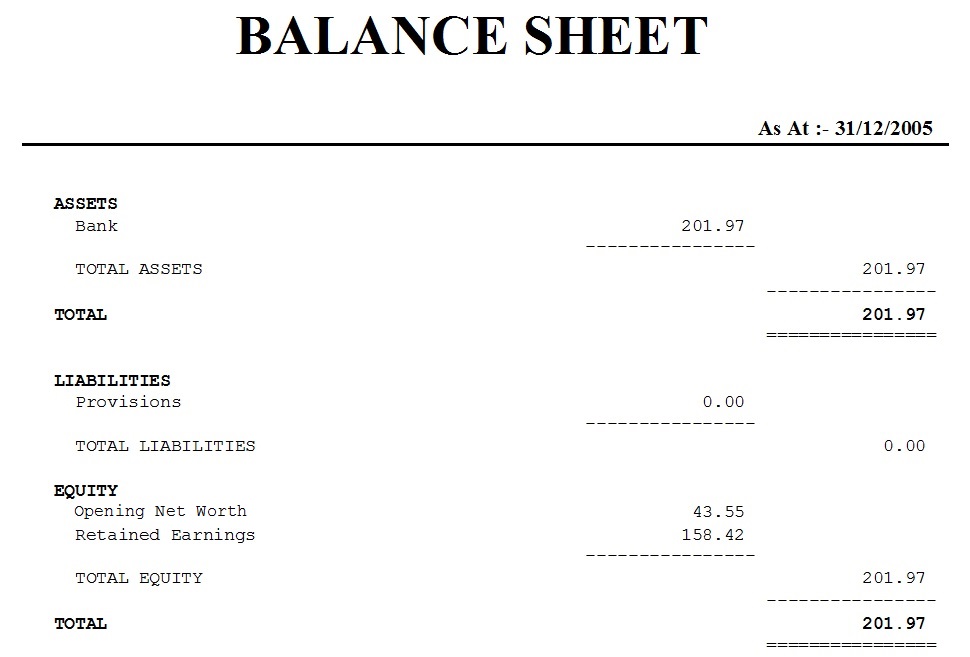
The effect is to increase John's total assets and total equity by the amount of his pay to 201.97.
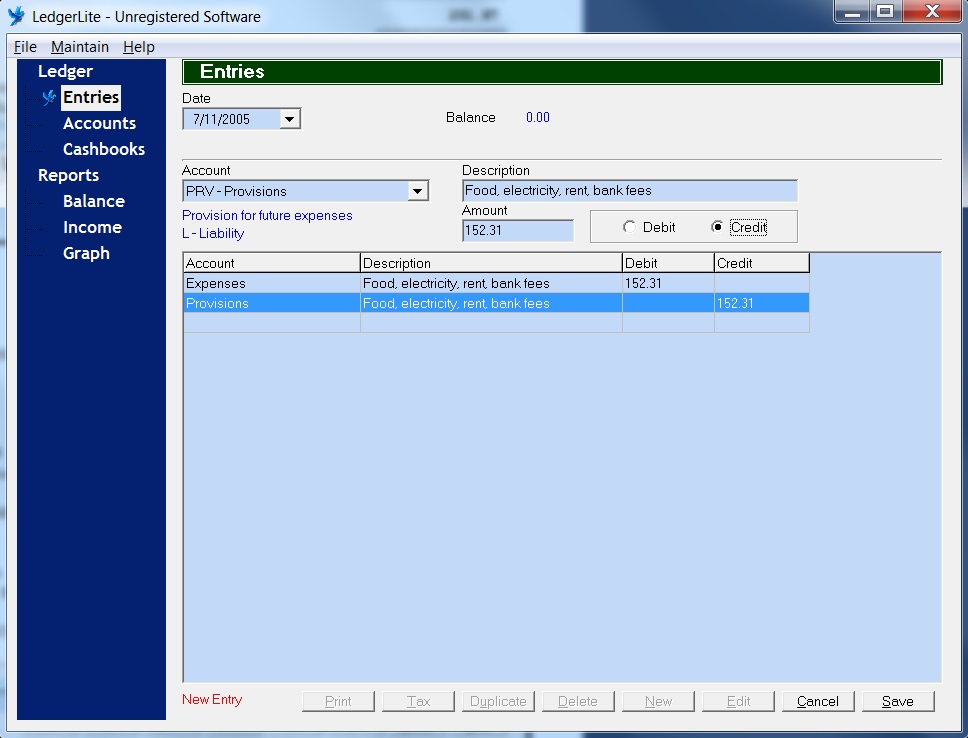
John then goes to the Entries screen by clicking on Entries in the dark blue navigation area
on the left. To set aside the funds needed to cover his anticipated expenses John makes a Ledger entry
by clicking on the New button to switch to New Entry mode. He then enters the Date
as 7/11/2005 and proceeds to create a double-entry by debiting his Expenses account by 152.31
and crediting his Provisions account by 152.31. Once the entry is complete John clicks on
the Save button to save the entry to the database.
When John looks at the balance sheet now he sees that his total assets are still 201.97. However
his total liabilities are now 152.31 instead of zero and his total equity has reduced to 49.66 (the difference between his assets
and his liabilities.)
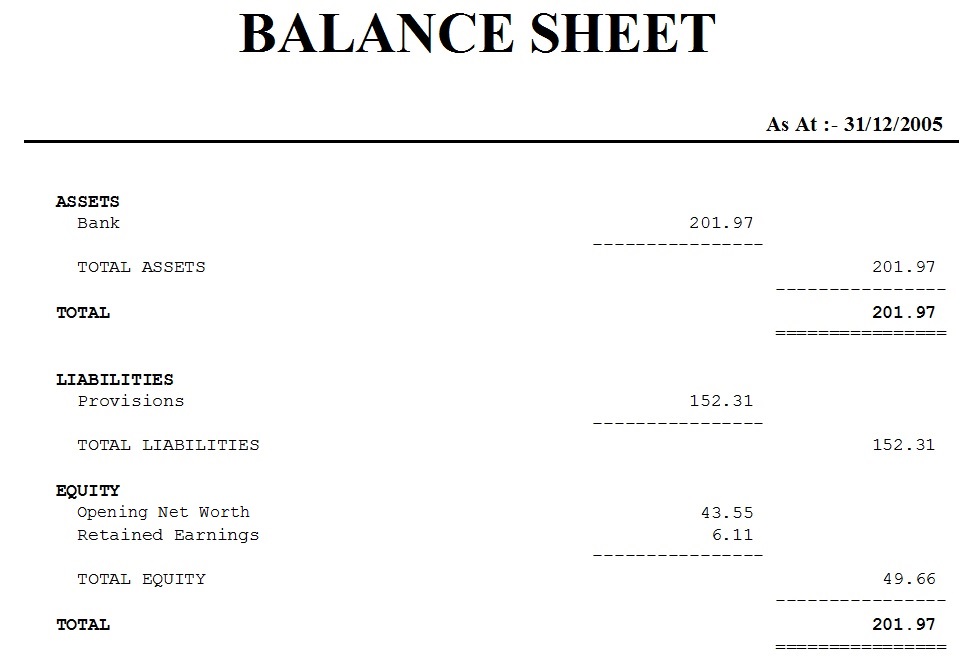
The balance sheet now provides a more accurate picture of John's financial position because it anticipates
his future expenses by treating them as a liability. In order to check his true financial position John
can look at his total equity in order to determine how much money he can spend without
affecting his ability to cover his anticipated expenses.
When John enters his next expense of 25.12 for food into the cashbook he now chooses PRV - Provisions as
the other account where previously he would have chosen EXP - Expenses.
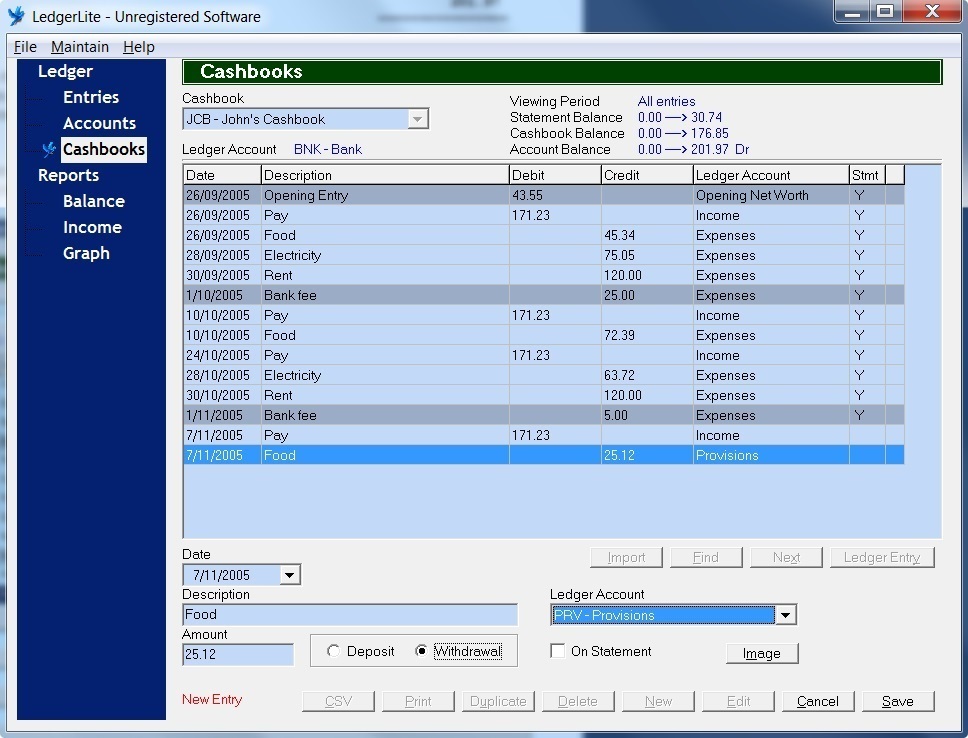
The effect of this entry is to reduce both his total assets and total liabilities by 25.12 leaving his
total equity (and true financial position) unchanged at 49.66.