Finance Demonstration
Begin by downloading and installing the GenFinII program from our download page.
Then double-click on the  icon on your desktop to
start the program.
icon on your desktop to
start the program.
You may receive a message from your firewall software asking if you would like GenFinII to act as a server. This occurs
because when you run GenFinII in standard mode each instance of GenFinII attempts to communicate directly with every other
instance on the network. This is to ensure that all users are kept up-to-date with any changes to the
database. You can safely disallow this unless you are planning to set up GenFinII for multiple users or to run
GenFinII in a client/server configuration.
You may also be asked to identify the IP address of your network if your computer is using multiple IP addresses.
Contents
Add a New Client
Create a Client Account
Find a Client
Find a Client Account
Add an Entry to a Client Account
Add Entries to Client Accounts in Batch Mode
Update a Client Account
Print a Client Account Statement
Maintain the Contract Charges
Create a Quote
Find a Quote
Print a Quote
Add a New Contract
Find a Contract
Print a Contract
Delete a Contract
Charge Default Interest to a Client Account
Settle a Contract
Print a Finance Ledger Listing
Add a New Client
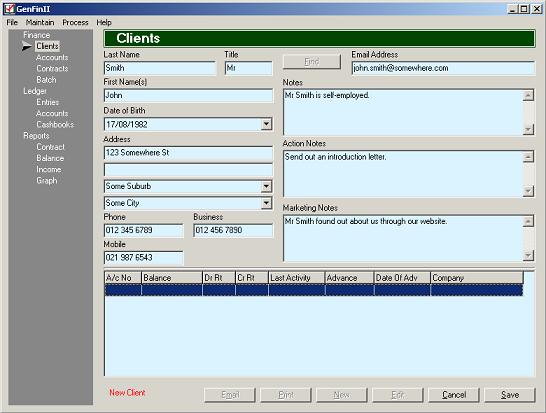
Click on Clients in the dark grey navigation area on the left. This will take you to the Clients screen.
To add a new client click on the New button at the bottom. The screen will switch to New Client mode.
This is displayed in the bottom left corner of the screen.
When you are finished entering the client's details click on the Save button to save the client to the database.
To edit a client click on the Edit button to switch the screen to Edit Mode. When you are finished click
on the Save button to save the changes to the database. Click Cancel to discard any changes.
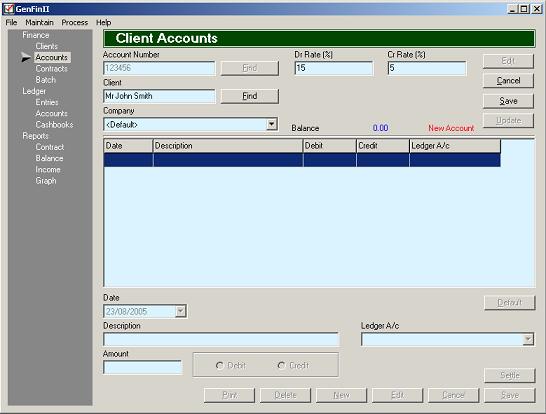
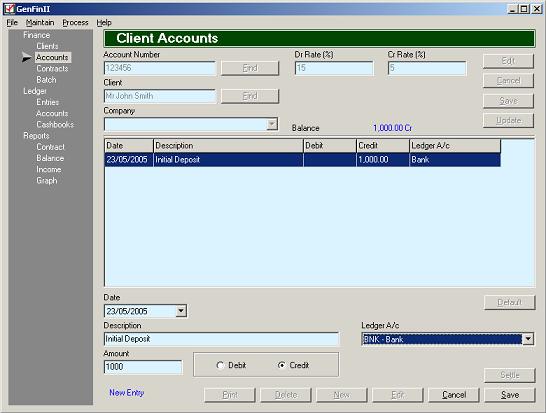
Create a Client Account
Click on Accounts under Finance in the dark grey navigation area on the left. This
will take you to the Client Accounts screen.
To create a new account enter a new number in the Account Number field. After confirming that you
wish to create a new account the screen will switch to New Account mode.
Click on the Find button next to the Client field to search for and select the client.
Select the general ledger accounting company from the Company drop-down list.
Enter the interest rates to be charged on debit balances or paid on credit balances. (These rates are only
applicable where the client account is not governed by an associated contract e.g. a deposit or revolving credit account.)
When you are finished entering the client account details click on the Save button to save the client account to the database.
To edit a client account click on the Edit button to switch the screen to Edit Mode. When you are
finished click on the Save button to save the changes to the database. Click Cancel to discard any changes.
Find a Client
Click on Clients in the dark grey navigation area on the left. This
will take you to the Clients screen.
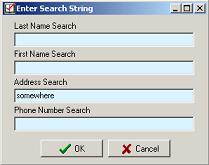
To find a client click on the Find button at the top. Enter text in the specified fields
and click on OK to select the client from a list.
Find a Client Account
Click on Accounts under Finance in the dark grey navigation area on the left. This
will take you to the Client Accounts screen.
Simply enter the account number into the Account Number field.
Or to find a client account click on the Find button next to the Account Number field to
select from a list in account number order.
Add an Entry to a Client Account
Click on Accounts under Finance in the dark grey navigation area on the
left. This will take you to the Client Accounts screen where you can enter the account number.
To add a new entry click on the New button at the bottom. The screen will switch to New Entry
mode. This is displayed in the bottom left corner of the screen.
When you are finished entering the details click on the Save button to save the entry to the database.
To edit an entry select it in the grid and then click on the Edit button to switch the screen to
Edit Mode. When you are finished click on the Save button to save the changes to the
database. Click Cancel to discard any changes. Click Delete to delete the entry from the database.
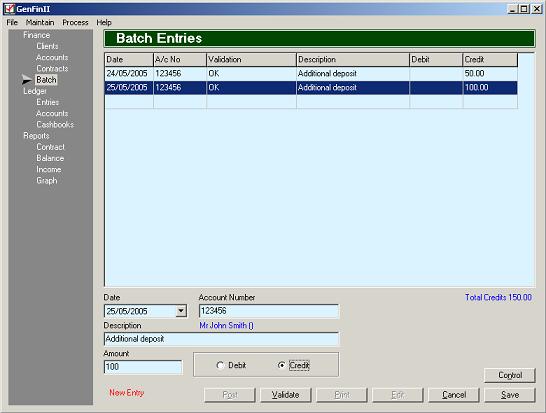
Add Entries to Client Accounts in Batch Mode
Click on Batch under Finance in the dark grey navigation area on the left. This will take you
to the Batch Entries screen.
To begin entering a new batch click on the New button at the bottom. The screen will switch
to New Entry mode. This is displayed in the bottom left corner of the screen.
Enter the date for the entry in the Date field. Then enter the client account number in the
Account Number field. The client's name should appear below this field followed by the accounting
company in parentheses.
You will notice that a new line appears at the top of the grid. The grid is used for viewing only.
All data must be entered using the fields below the grid.
Next enter the details in the Description field, the amount in the Amount field and indicate if it
is a Debit or Credit.
Press the <Enter> key to go to the next line (or click on the blank line at the bottom of the grid) and
repeat the process. When you are finished click on the Save button to save the batch entries to the database.
To edit an entry click on the Edit button to switch the screen to Edit Mode. Then click on
the entry in the grid that you wish to alter. To delete an entry hold down the <Ctrl> key and
press <Delete>. When you are finished click on the Save button to save the changes to the
database. Click Cancel to discard any changes.
After all entries have been made click on the Post button to update the client accounts.
Update a Client Account
Click on Accounts under Finance in the dark grey navigation area on the left. This
will take you to the Client Accounts screen where you can enter the account number.
To update the account click on the Update button. This will automatically calculate and create
the entries required to bring the account up-to-date. For example if there is no associated contract then
interest is charged or paid at the end of each month on the average daily debit or credit balance during that month.

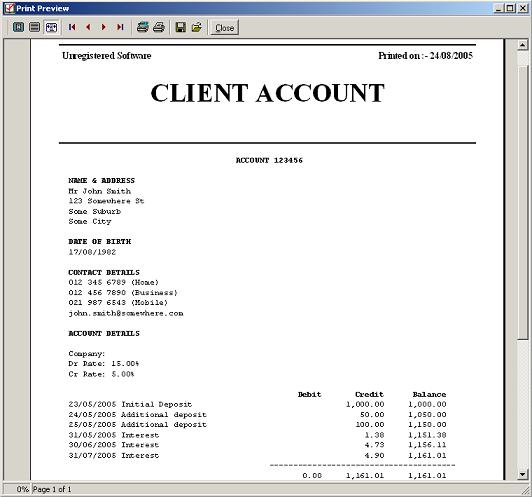
Print a Client Account Statement
Click on Accounts under Finance in the dark grey navigation area on the left. This will
take you to the Client Accounts screen where you can enter the account number.
To print a statement click on the Print button.
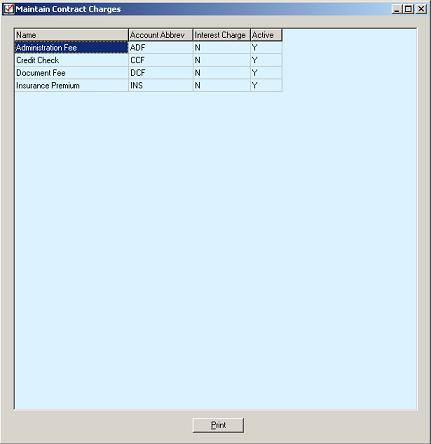
Maintain the Contract Charges
Go to the Maintain menu and select Contract Charges. To add a new charge
use the <Insert> key on your keyboard.
Enter the name of the contract charge in the Name field. This is used to identify the
charge on the contract entry screen.
Enter the general ledger account abbreviation for this charge in the Account Abbrev field or
double-click to select it from a list.
A contract charge is normally treated as part of the initial amount financed. If you prefer
the charge to be amortized (as part of the interest charged) over the period of the contract
enter Y in the Interest Charge field.
To disable a contract charge enter N in the Active field.
To edit the details of a contract charge click on the field you wish to edit and then click it a
second time (as distinct from a double-click.)
Once a contract charge has been added it cannot be deleted.
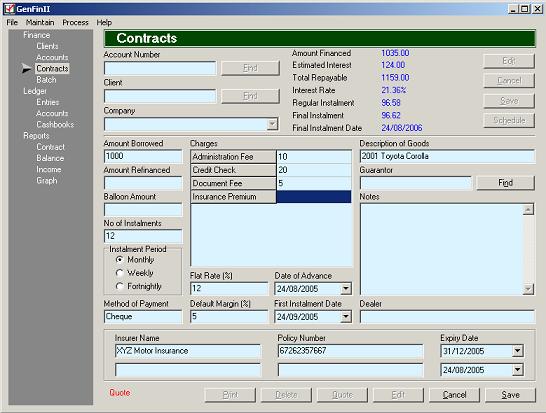
Create a Quote
Click on Contracts under Finance in the dark grey navigation area on the left.
This will take you to the Contracts screen.
To create a new quote click on the Quote button at the bottom. The screen will switch
to Quote mode. This is displayed in the bottom left corner of the screen.
When you are finished entering the quote details click on the Save button to save the quote to the database.
To edit a quote click on the Edit button to switch the screen to Edit Mode. When you are
finished click on the Save button to save the changes to the database. Click Cancel to discard any changes.
Find a Quote
Click on Contracts under Finance in the dark grey navigation area on the left. This will
take you to the Contracts screen.
Click on the Find button next to the Account Number field to select the quote from a list.
This list includes both quotes and contracts ordered by Date of Advance.
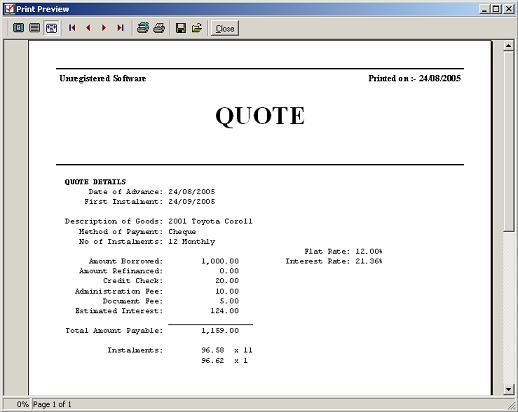
Print a Quote
Click on Contracts under Finance in the dark grey navigation area on the left. This will take you to the Contracts screen where you can click on the Find button next to the Account Number field to select the quote from a list.
To print the quote click on the Print button.
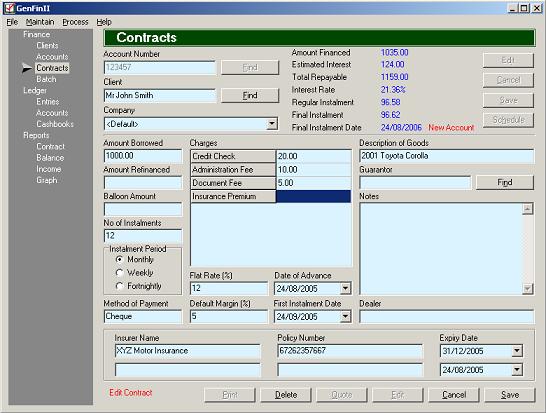
Add a New Contract
Click on Contracts under Finance in the dark grey navigation area on the left.
This will take you to the Contracts screen.
To create a new contract enter a new number in the Account Number field. After confirming
that you wish to create a new contract the screen will switch to New Contract mode.
(If a quote is showing on-screen when you create the new contract you will be prompted whether or not
you would like to use the details from the displayed quote.)
Click on the Find button next to the Client field to search for and select the client.
Select the general ledger accounting company from the Company drop-down list.
When you are finished entering the contract details click on the Save button to save the contract to the database.
To edit a contract click on the Edit button to switch the screen to Edit Mode. When you are finished
click on the Save button to save the changes to the database. Click Cancel to discard any changes.
Find a Contract
Click on Contracts under Finance in the dark grey navigation area on the
left. This will take you to the Contracts screen.
Simply enter the account number into the Account Number field.
Or to find a contract click on the Find button next to the Account Number field to select the
contract from a list. This list includes both quotes and contracts ordered by Date of Advance.
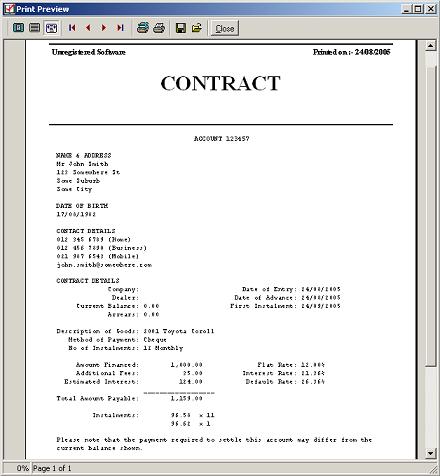
Print a Contract
Click on Contracts under Finance in the dark grey navigation area on the left. This
will take you to the Contracts screen where you can enter the account number.
To print the contract click on the Print button.
Delete a Contract
Click on Contracts under Finance in the dark grey navigation area on the left.
This will take you to the Contracts screen where you can enter the account number.
To delete the contract click on the Edit button and then on the Delete button.
(The program will not allow a contract to be deleted unless the account balance is zero.)
Charge Default Interest to a Client Account
Click on Accounts under Finance in the dark grey navigation area on the left.
This will take you to the Client Accounts screen where you can enter the account number.
To calculate and charge default interest to the account click on the Default button.
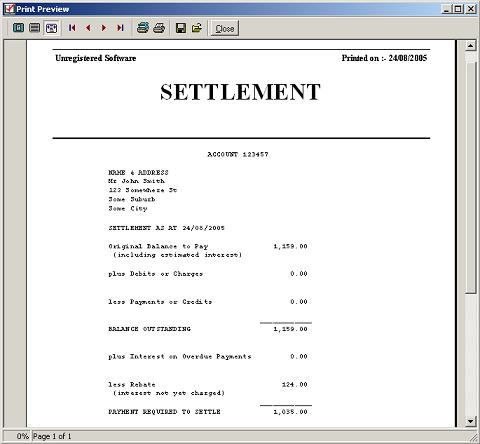
Settle a Contract
Click on Accounts under Finance in the dark grey navigation area on the left.
This will take you to the Client Accounts screen where you can enter the account number.
To print a settlement statement click on the Settle button.
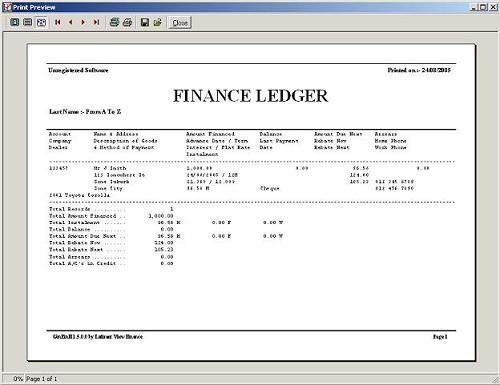
Print a Finance Ledger Listing
Click on Contract under Reports in the dark grey navigation area on the left.
This will take you to the Contract Listings screen.
Select LDG - Finance Ledger Listing from the Report Type drop-down list.
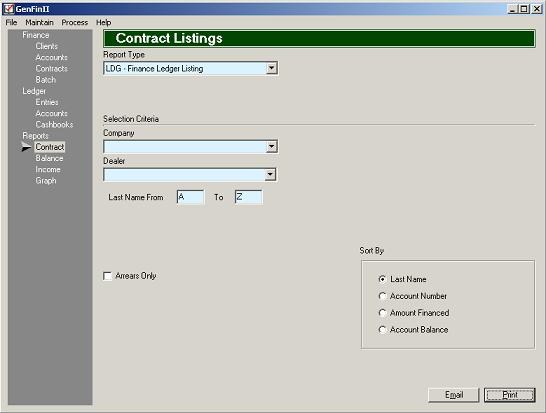
Enter the selection criteria and click on the Print button.